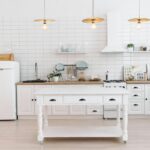
Pro kitchen counters aren’t cluttered—they’re edited. Start by clearing everything off and keeping only daily essentials organized into three distinct zones using trays. Remove unused appliances and swap basic items like dish soap into matching containers. Create one strong focal point with serving boards or an open cookbook, then add potted plants in odd-numbered groupings at varying heights. Move storage to walls with magnetic strips and rails. Finally, style with accessories that matter to you. These techniques work together to create any counter that feels organized and intentional.
Start With Clean Kitchen Counters: Edit and Declutter First
The truth is, you can’t decorate a space that’s buried under clutter—I learned this the hard way after my kitchen counters became a catch-all for everything from yesterday’s mail to appliances I’d never use. Here’s what worked: I removed absolutely everything from my countertops, then cleaned the surfaces thoroughly. This blank slate forced me to think critically about what actually belongs there. I relocated papers, keys, and mail to designated spots elsewhere. Then I reintroduced only daily-use items and visually appealing decor. This declutter-first approach revealed how much counterspace I’d actually wasted. By starting with clean countertops and editing ruthlessly, your kitchen moves from chaotic to intentional—a solid foundation for decor that serves a real purpose.
Corral Daily Essentials in Three Counter Zones With Trays
Now that you’ve cleared your counters and identified what actually deserves real estate up there, it’s time to corral everything into organized zones—and trays are your covert asset for pulling this off without making your kitchen look like a storage unit.
Trays are your secret weapon for organizing counter zones while keeping your kitchen looking intentional, not cluttered.
I create three distinct counter zones using varied trays:
- By the stove: salt, pepper, spices, and oils in a wooden tray
- Near the sink: sponges, soap, and brushes grouped together
- On the island: mail, keys, and daily tools on a larger tray
These organization zones keep your kitchen functional by grouping like items without consuming extra space. Choosing trays in different materials—wood, marble, woven fiber—adds visual interest while keeping everything accessible. A lazy Susan on your island maximizes frequently used items. Rotating seasonal contents maintains freshness while preserving functionality.
Remove Appliances You Don’t Use Every Single Day

How many kitchen appliances are actually sitting on your counters right now that you haven’t touched in weeks? I used to have the same problem. My countertop clutter was out of control until I got honest about what I actually use daily.
Here’s what worked: banish anything that doesn’t earn its real estate every single day. That fancy stand mixer? Gone to the garage. The slow cooker collecting dust? Relocated to a cabinet. I kept only everyday appliances like my coffee maker and toaster visible.
For knives, I ditched my bulky knife block for a wall-mounted rail—an instant space-saving solution. Now my counters feel organized and functional. When you remove what’s rarely used, you’re not just decluttering. You’re creating a kitchen where cooking actually happens.
Swap Basic Everyday Items for Beautiful, Intentional Ones

Once you’ve cleared away the appliances you don’t use, you’ve got breathing room—and that’s your chance to swap out those basic everyday items for things that actually look good sitting out.
Start by decanting dish soap, coffee pods, and pasta into matching clear containers that fit your kitchen’s style. Here’s what I’d tackle first:
- Replace visible sponges with white or natural options
- Store olive oil and salt in attractive canisters on the counter
- Swap your cluttered knife block for a drawer insert
Then upgrade your utensil holder with a decorative glass jar or wide-top vase. Use trays and small crocks to group essentials together. When everything matches and serves a purpose, your counters have a sense of deliberation—not just function.
Create One Strong Focal Point (Serving Board or Open Cookbook)

With your everyday items now looking organized and intentional, you have a clean canvas to work with—and that’s where a strong focal point comes in. I create mine using two or three serving boards in varying sizes, shapes, and materials. Mix striped marble with wood, then arrange them both vertically and horizontally for visual variety. Vintage boards add charm and work well for display-only purposes.
Pair your focal point with an open cookbook on a stand to add height variation and a lived-in quality. A repurposed Prosecco bottle as a soap dispenser ties everything together.
Here’s the key: keep surrounding items minimal and well-spaced. Your focal point needs breathing room to actually serve as an anchor in the space. This restraint is what makes your countertop decor look organized rather than cluttered.
Layer Warmth With Wood, Ceramic, and Living Greenery

I’ve found that mixing natural textures—think wood bowls, woven trays, and ceramic pieces—creates warmth without making your counters feel cramped, and honestly, it’s harder to mess up than you’d think. Adding living greenery in footed planters or small potted stems breaks up all that solid material and brings in fresh color that keeps your kitchen feeling alive. Group these elements in odd numbers (three or five pieces work best), and you’ll get that curated look that somehow says “I have my life together” even when you don’t.
Natural Textures and Warmth
Creating warmth on your kitchen counters doesn’t require a complete overhaul—you just need the right mix of materials working together. I’ve found that layering wood boards, ceramic bowls, and natural greenery creates the textural contrast that keeps counters from feeling bare.
Here’s what I do:
- Pair warm materials like light wood against dark marble to make textures visually distinct
- Add potted plants or branch arrangements for organic color without creating clutter
- Place seasonal fruit in decorative bowls to combine practicality with visual interest
The result comes from mixing materials deliberately. A white ceramic bowl on white marble might seem plain, but add a wooden board underneath, and you’ve got dimension. Living greenery ties everything together, making your space feel complete and inviting—like you actually want to spend time there.
Green Plants as Accents
Why do some kitchen counters feel alive while others feel sterile? I’ve found the answer: greenery. Adding plants changes my counter from boring to inviting.
I start by choosing low-maintenance varieties like pothos or snake plants—honestly, I can’t kill these even when I forget to water them. I pair them with wood, ceramic, and marble textures already on my counter, creating a natural look that shows thought and care.
Here’s my strategy: I group one large plant with smaller pots arranged on a tray to add height without creating clutter. Then I nestle them beside vases and cutting boards to build texture and depth throughout my counter decor.
I keep plants away from heat sources and flames, positioning them where I can water them easily. This simple addition makes my kitchen feel welcoming—like a space where I actually belong.
Group Decorative Objects in Sets of 3, 5, or 7
One of the easiest ways to improve your counter styling is to embrace the rule of odds—grouping your decorative pieces in sets of 3, 5, or 7 instead of scattering them randomly. This creates rhythm and visual cohesion that makes your space feel organized and deliberate.
Embrace the rule of odds: group decorative pieces in sets of 3, 5, or 7 to create rhythm and visual cohesion on your counters.
Here’s what works best:
- Mix heights strategically—pair tall pieces with grounded objects and sculptural elements
- Vary textures throughout each set to maintain interest without creating visual chaos
- Group similar items together, like canisters or vases, to form mini-galleries
Position these sets near your backsplash or counter edges to break up empty space while keeping most of your surface usable. The odd-number grouping prevents that awkward, unbalanced feeling. This approach produces professionally styled counters without appearing overdone.
Add Vertical Interest With Potted Plants and Varying Heights

Plants bring a bare kitchen counter to life—and you don’t need gardening expertise to do it. Creating a vertical display is simpler than you might expect.
Mix tall and short pots to build dimension. Place a single tall planter alongside smaller pots on a tray, then use stands or pedestals to raise some plants. This varying heights approach keeps your counter decor from looking flat.
Choose plants with contrasting foliage—broad leaves paired with pointy fronds add visual texture. Group them in odd numbers (3 or 5 items) for balance.
Select species that match your counter’s light conditions. Use drainage-friendly pots to prevent water damage. You’ll create a well-designed display that looks thoughtful and organized.
Move Storage to Your Walls With Magnetic Strips and Rails

How’d you like to reclaim your countertops? Magnetic strips and wall rails are practical solutions for kitchen organization. I’ve moved my storage vertical, and the results speak for themselves.
These solutions free up counter space while keeping your tools within arm’s reach. Here’s what I recommend:
- Install magnetic strips under existing shelves for knives and metal utensils
- Mount wall rails along your backsplash to hang pots and frequently used items
- Position storage at eye level for easy access and visual balance
The benefit? They’re functional décor. Your kitchen doesn’t just work better—it looks organized and intentional. Moving storage to your walls means saying goodbye to cluttered counters and hello to a kitchen with more breathing room.
Style Your Counter Story With Meaningful Accessories

Your countertops shouldn’t look like a showroom—they should tell your story. I arrange my counter decor using odd-numbered groupings of three, five, or seven pieces. This simple trick prevents visual chaos while celebrating what actually matters to you.
I mix textures intentionally: ceramic canisters paired with wooden spoons, glass vases holding fresh branches, and metal utensil holders. These contrasting materials create rhythm without feeling cluttered. I place an open cookbook on a stand nearby—it’s both beautiful and useful.
Grouping pieces by height matters too. I position oversized vases as focal points, then layer smaller items around them. This functional aesthetics approach balances what I need with what I love. Your kitchen counter becomes a direct expression of how you actually live.