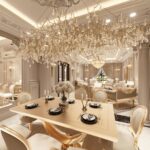

Your kitchen’s above-cabinet space doesn’t have to become a dust collector. Start by measuring your ceiling height—it dictates everything. Choose a cohesive color palette that echoes your cabinets, then arrange décor in odd numbers at varying heights for visual interest. Layer woven baskets with greenery, add a bold mirror or artwork, and install battery-powered lights for warmth. Stick with washable materials since grease settles up there. Secure everything firmly and commit to biweekly dusting. The specifics on executing each strategy is where the results happen.
Assess Your Space and Ceiling Height

How much vertical real estate are we actually working with here? Before you start shopping for decor, measure the distance between your cabinet tops and ceiling. This gap determines everything—literally. High ceilings give you freedom to create visual interest, while shorter spaces require restraint.
I’ve learned this the hard way. Cramming too much into a tight space above cabinets makes kitchens feel cluttered and cramped. Your ceiling height dictates how you’ll balance items.
Taller kitchens let you play with varying heights and groupings. You can stack baskets, add plants, and layer objects without overwhelming the room. Lower ceilings? Keep it minimal—think one strategic basket or a small plant grouping.
Understanding your space above cabinets first prevents costly mistakes later.
Determine If Above-Cabinet Storage Fits Your Lifestyle

Before you fill that space above your cabinets, ask yourself honestly: are you willing to dust regularly, or will those items turn into grease-collecting dust magnets? Your lifestyle matters here—if you rarely use fancy serving bowls, above-cabinet storage makes sense, but if you’re someone who avoids cleaning tasks, you’ll want to reconsider. Think about what actually needs storing versus what you’d just be showing off, because the best storage system is one you’ll actually maintain.
Maintenance Reality Check
When you’re decorating above your cabinets, here’s the reality: that space becomes a dust and grease magnet faster than you’d think. The area collects sticky residue from cooking, especially near the stove, and it requires regular cleaning maintenance to keep things looking fresh.
Don’t place anything up there that you’ll need to access daily. Instead, choose washable décor or pieces you can easily wipe down. Secure everything firmly to prevent accidents during earthquakes or sudden movement. Keep your arrangement minimal—just a few focal pieces. This approach reduces your cleaning burden while keeping your display visually tidy and manageable. Your future self will appreciate it.
Lifestyle And Storage Needs
Since above-cabinet space offers real storage potential, you need to be honest with yourself about whether it actually fits how you live. Ask yourself: Will I realistically access these items? If you’re storing seasonal serveware or bulky tureens up there, make sure you won’t need them constantly. Frequent reaching and climbing gets old fast. Consider your household’s activity level too. With kids or pets around, items sitting above kitchen cabinets collect dust and grease—which means maintenance falls on you. If you’re already stretched thin, this space above the cabinets might become an eyesore rather than a useful feature. Think about your actual lifestyle before committing. Sometimes the best storage solution is one you’ll actually maintain.
Choose a Cohesive Color Palette That Ties to Your Cabinetry

The key to making your above-cabinet décor look deliberate (rather than like stuff you couldn’t fit elsewhere) is anchoring everything to a unified color palette that echoes your cabinetry and backsplash. I’ve found that matching wood tones creates immediate visual connection—if your cabinets are warm oak, lean toward honey-hued baskets and natural wood accessories. Neutrals work well too; cream, gray, and soft whites tie together without competing for attention. Consider metallic accents like brushed gold or matte black that reflect your hardware finishes. When your décor mirrors your cabinetry’s character, the whole kitchen feels designed rather than assembled. This deliberate approach makes that awkward upper space a polished extension of your kitchen’s style, giving you confidence in every visible detail.
Arrange Above-Cabinet Collections in Odd Numbers and Heights

When I’m styling the space above my cabinets, I’ve learned that grouping objects in odd numbers—three, five, or seven pieces—creates a naturally pleasing arrangement that feels well-considered rather than random. Varying the heights of these items is where visual interest develops; I’ll pair a tall vase with shorter candlesticks or stack books beside a sculptural piece to give the display dimension and prevent that flat, monotonous look. This combination of odd groupings and layered heights turns what could’ve been a boring shelf into a carefully composed vignette that draws the eye.
Odd Numbers Create Visual Interest
arranging three, five, or even seven objects above your cabinets beats lining up two or four every single time.
Odd numbers create natural visual interest that even numbers simply can’t match. When I group framed art with faux plants in threes or fives, my eye actually travels across the display instead of stopping dead. It’s weird how our brains work that way.
The trick is avoiding symmetry. I pair a tall framed art piece with shorter faux plants, then add another taller element to keep things moving. This rhythm prevents that boring, staged feeling.
I’ve tried the even-number approach, and it always felt flat and lifeless. Odd groupings feel collected and intentional—the kind of arrangement that looks professionally designed.
Layered Heights Add Dimension
Group taller items with shorter accents on alternating sides. Imagine a visual seesaw—tall on the left, short on the right, then reverse the pattern. This rhythm keeps your eye moving across the display instead of glazing over it.
Think high, mid, and low elements within each cluster. Stack books under a ceramic piece. Tuck a small plant beside a larger artwork. These layered heights create a display that shows clear thought and arrangement in your cabinets.
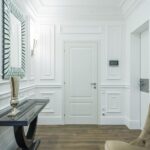
Add Artwork and Mirrors for Depth and Light

How do you fill that awkward space above your cabinets without making it look like a cluttered shelf at a thrift store? Artwork and mirrors are practical solutions.
Fill the awkward space above cabinets with artwork and mirrors instead of cluttered shelves.
A large-scale piece creates an instant focal point while visually balancing your tall ceiling. Skip the tiny frames—they’ll vanish up there. Instead, hang one bold piece that coordinates with your warm woods or neutrals.
Mirrors work well too. They bounce natural light around your kitchen, making everything brighter and more spacious. Position them to reflect windows or light sources for maximum impact.
Here’s my standard approach: secure everything properly. Heavy artwork and mirrors need sturdy installation above your head. Safety comes first.
Layer Baskets and Natural Textures for Warmth

I’ve found that layering baskets above cabinets fills that awkward gap with a purposeful display—unlike some of my decorating experiments that just collect dust. You’ll want to mix different textures like woven baskets with natural wood bowls or reed accents, which creates visual interest while keeping everything looking deliberate rather than like you’re storing overflow. The trick is arranging them in odd numbers at varying heights, so your eye moves intuitively across the space instead of getting stuck on one spot.
Mixing Textures and Materials
Ever notice how a shelf filled with only one type of item looks a bit… flat? I learned this the hard way. That’s where mixing textures becomes useful. I layer woven baskets with rattan and wire options to create actual depth—not just stuff sitting there looking lonely. Natural materials like wood bowls and cutting boards break up the monotony beautifully. Here’s the trick: pair these with soft textiles or wax paper liners. They soften everything while protecting your cabinets from grease splatters. Stick to earthy beiges, warm woods, and muted greens so your collection feels organized rather than chaotic. Vary your heights and cluster items in odd numbers—three or five pieces work best. Your cabinet top becomes something that looks designed.
Creating Visual Warmth Above
Once you’ve got your textures mixed and your heights varied, it’s time to dial up the warmth factor—and that’s where baskets really shine. I’ve found that layering basketry in different sizes creates an inviting, lived-in feeling that plain cabinets simply can’t match. Mix cream-colored woven baskets with natural wood tones to keep everything harmonious. Here’s my trick: lean them at angles rather than stacking rigidly. It looks purposeful without feeling overdone. Now add dried stems or trailing greenery tucked between baskets—this extends your organic texture upward and ties everything together. The result? Your kitchen suddenly feels warm and welcoming, like you’ve actually spent time cultivating the space.
Styling With Natural Elements
How do you make plain cabinet tops more inviting in your kitchen? Layering natural elements creates warmth that makes the space feel lived-in.
Start by incorporating these styling moves:
- Layer woven baskets in varying sizes to add texture and softness against hard cabinetry
- Introduce greenery with low-maintenance plants like succulents or pothos that thrive on high shelves
- Mix heights and materials using wooden bowls, rattan elements, and ceramic planters for visual interest
The key is being selective rather than overcrowding. I stick to a cohesive color palette so my baskets and greenery work together as one arrangement rather than scattered objects. When you group items with purpose, your kitchen becomes a space where people actually want to gather.
Select Functional Storage That Works and Looks Good
The real trick to decorating above your cabinets is choosing storage that actually works and looks good. Functional pieces matter as much as aesthetics. Select lightweight baskets and decorative bins that match your cabinet color, reducing both maintenance and visual clutter. For a display area, use clear glass containers to showcase seasonal items while keeping dust and grease out. Arrange storage in odd numbers at varied heights—it creates a balanced, intentional look without appearing random.
| Storage Type | Weight | Maintenance | Visual Impact | Durability |
|---|---|---|---|---|
| Woven baskets | Light | Low | Warm | Medium |
| Glass containers | Light | Medium | Clean | High |
| Decorative bins | Light | Low | Cohesive | Medium |
| Ceramic vessels | Medium | Low | Elegant | High |
| Fabric boxes | Light | Medium | Soft | Low |
The key? Choose pieces you’ll actually use.
Add Battery-Powered Lights or Small Fixtures

Why settle for dim, shadowy shelves when a few well-placed lights can improve your cabinet display? I’ve discovered that battery-powered LED strips and puck lights work well for kitchen lighting above cabinets. They install without tools or hardwiring, which honestly appeals to my preference for simple solutions.
Here’s what makes this approach work:
- Wireless fixtures run on AA or rechargeable batteries, offering quick, fuss-free installation along your cabinet tops
- Dimming and color options (2700K–4000K) create warm, ambient glows that suit your décor and make the space feel inviting
- Motion-sensing models conserve energy by activating only when you’re there, perfect for nighttime navigation
Just swap out batteries every 6–12 months to keep brightness consistent. You’ll highlight your favorite pieces while using a practical lighting solution that many homeowners have adopted for their kitchens.
Choose Washable and Sealed Materials to Reduce Cleaning

Kitchen grease has a sneaky way of settling onto everything above your cabinets, and I’ve learned the hard way that choosing the right materials reduces cleaning time significantly. I now favor washable, sealed surfaces like vitrified ceramic, glazed porcelain, or sealed wood finishes. These materials resist grease and dust buildup effectively. Glass, metal, and sealed baskets work well too—they’re smooth and wipeable, unlike porous textures that trap cooking aerosols. I’ve also discovered that placing wax paper or parchment between my decor and cabinet tops simplifies cleaning considerably. I simply replace the paper when needed. I’ve ditched fabrics entirely since they’re impossible to keep clean. Stick with simple silhouettes and cohesive colors, and you’ll minimize dirt traps while maintaining a polished look.
Plan Your Layout and Schedule Regular Maintenance

Once you’ve locked down materials that won’t turn into grease magnets, it’s time to actually arrange them up there—because randomly plunking down whatever fits is how you end up with a cluttered mess. Grouping objects in odd numbers (think three or five items rather than pairs) and varying their heights creates a balanced look that draws attention upward rather than to your cluttered counters.
Odd numbers and varying heights create balance—draw eyes up, not to cluttered counters below.
Your decor planning pays off when you establish a maintenance schedule:
- Dust every two weeks using a microfiber cloth to catch grease buildup
- Rotate seasonal items monthly to keep displays fresh
- Wipe down lighting fixtures quarterly so your ambiance stays bright
This routine keeps your above-cabinet space looking polished without feeling like a chore. You’re creating something worth maintaining.